
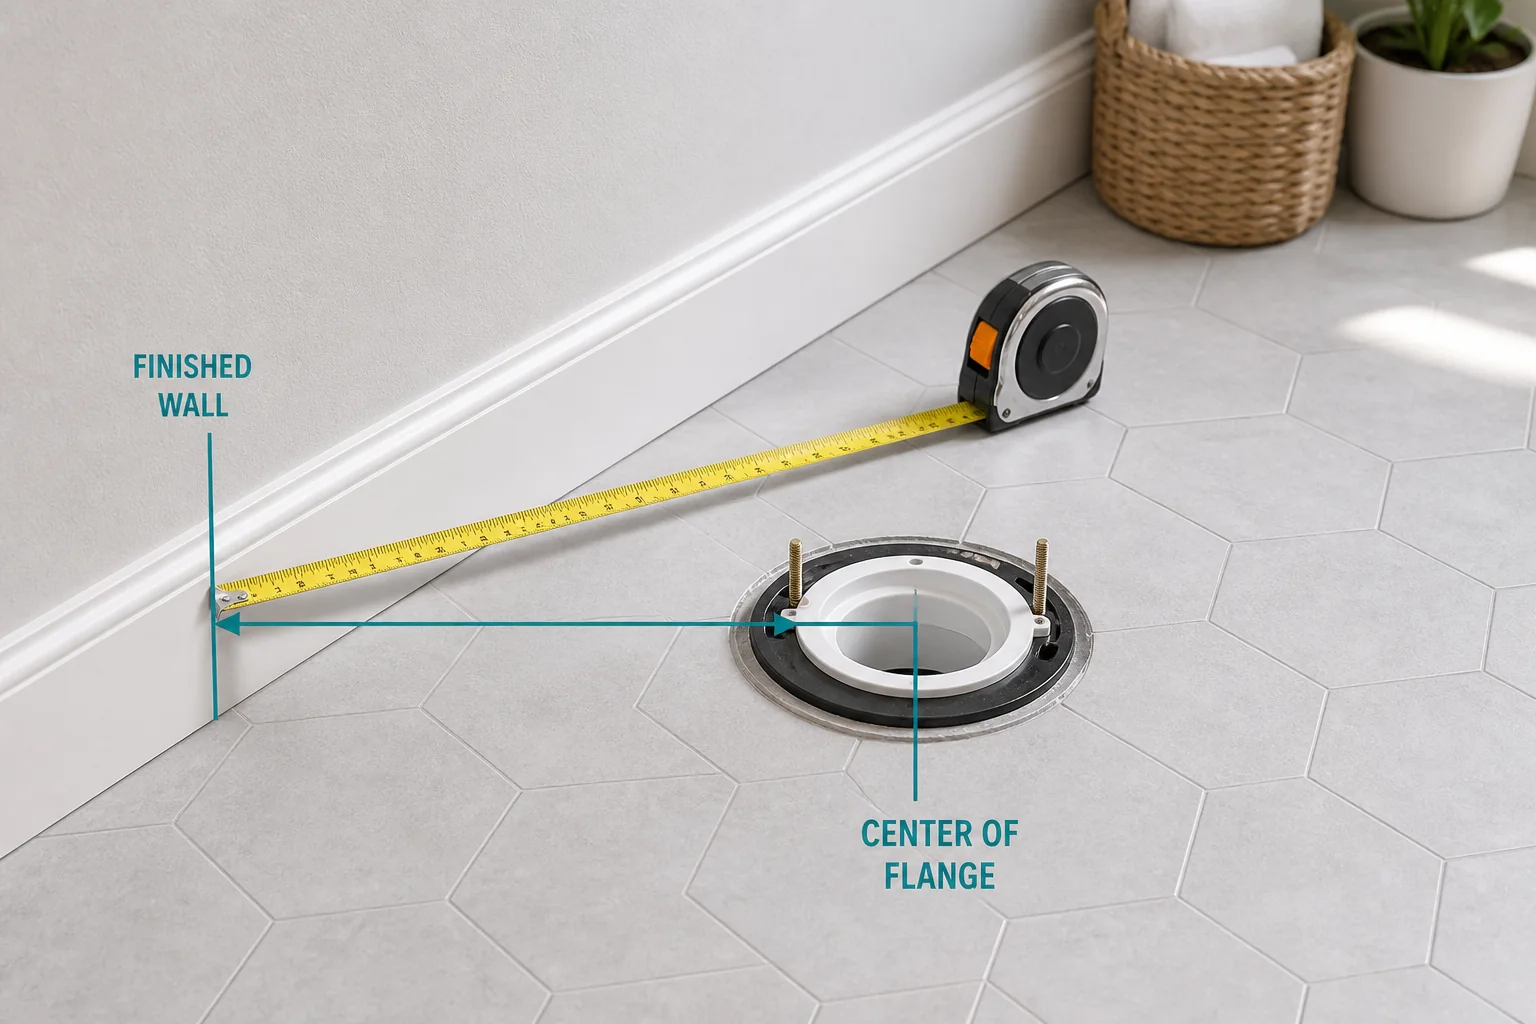
Knowing how to measure toilet rough in prevents one of the most frustrating bathroom fixture mistakes: buying a toilet that cannot sit where the drain is. The rough-in is the distance from the finished wall behind the toilet to the center of the floor drain, usually represented by the centerline of the closet bolts that hold the toilet to the flange.
Answer-first summary: Measure from the finished wall, not the baseboard, to the center of the closet bolts or the drain opening. Compare that number with the toilet’s installation sheet before buying. Many toilets are sold by rough-in size, and manufacturer pages such as American Standard’s toilet listings organize models by rough-in options, but the exact requirement is model-specific.
What toilet rough-in means
Toilet rough-in is a layout measurement, not the size of the toilet bowl or tank. It tells you where the toilet’s waste outlet must align with the floor flange. Manufacturer installation drawings commonly show the rough-in as a horizontal distance from the finished wall to the centerline of the waste outlet or bolts. For example, Kohler’s installation specification uses a centerline dimension from the finished wall to locate the toilet outlet, which is why measuring to the bolt centerline is the practical homeowner method. See the manufacturer’s drawing style in this Kohler toilet installation specification.
The key phrase is finished wall. That means the visible wall surface after drywall, tile, paneling, or other wall finish is installed. Do not start from the baseboard, shoe molding, wainscot cap, or the back of the tank on the existing toilet.
Tools and inputs you need before measuring
- Tape measure that can reach from the wall to the toilet bolts.
- Flashlight, especially if the bolt caps are hard to see.
- Flat tool or putty knife to lift plastic bolt caps, if present.
- Paper or phone note to record the measurement and the toilet model you are considering.
- Manufacturer installation sheet for the replacement toilet.
If you are planning a larger bathroom update, keep the toilet rough-in note with other fixture measurements. Home DVP’s Bathroom Fixtures section can help you organize related fixture decisions, and our guides to bathroom vanities and shower heads cover other common upgrade choices.
How to measure toilet rough in, step by step
- Find the finished wall behind the toilet. Identify the flat wall surface directly behind the tank. If there is baseboard trim, ignore it.
- Locate the closet bolts. Look at the base of the toilet where it meets the floor. Most floor-mounted toilets have one bolt on each side, often covered by small plastic caps.
- Expose the bolt center if needed. Gently lift the cap without forcing it. You do not need to remove the toilet.
- Measure from the wall to the bolt center. Hook or place the tape measure against the finished wall and read the distance to the center of either bolt. The bolts are positioned across the flange centerline, so the bolt centerline is normally the easiest visible proxy for the drain center.
- Repeat on the other side if accessible. If the two readings differ slightly, recheck that the tape is square to the wall and not angled.
- Write down the nearest practical reading. Do not assume the number from memory. Record the measurement and take a photo if you are shopping in person.
- Compare with the exact toilet specification. Use the installation sheet for the model, not just a shelf label or generic product description.
Where to measure on common bathroom situations
| Situation | Where to start the tape | Where to end the tape | Important caution |
|---|---|---|---|
| Existing toilet still installed | Finished wall behind the tank | Center of a closet bolt | Do not measure to the tank or the front of the bowl. |
| Toilet removed | Finished wall behind the flange | Center of the flange opening | Confirm the flange is not visibly damaged or off-center before ordering. |
| Baseboard behind toilet | Wall surface above the baseboard | Center of bolt or drain | Baseboard thickness can make the rough-in look smaller than it is. |
| Tiled wall behind toilet | Face of the tile, if tile is the finished wall | Center of bolt or drain | If tile will be added later, the final finished wall surface may move forward. |
| New construction or remodel | Planned finished wall surface | Planned drain centerline | Use the toilet manufacturer’s rough-in drawing and local plumbing requirements. |
Finished wall vs. baseboard: the mistake that changes the answer
The most common rough-in error is starting the tape from the baseboard. Baseboard is trim, not the finished wall plane used in toilet specification drawings. If you measure from trim, the rough-in can appear shorter than it really is, which may lead you to reject a toilet that would fit or choose a compact model for the wrong reason.
If the tank is close to the wall, do not use the gap behind the tank as proof of the rough-in. Tank shape varies by model. A toilet can have the correct outlet rough-in and still leave a visible gap or sit close to the wall, depending on the tank design shown in the manufacturer’s specification.
How to interpret the number you get
Once you have a measurement, treat it as a fit question, not a decoration choice. Toilet manufacturers list rough-in options for their models. American Standard’s toilet category, for example, lets shoppers review toilets by rough-in configuration, while Kohler’s specification sheet demonstrates why the exact dimension belongs in the model’s installation drawing. The practical rule is simple: the toilet you buy should match the rough-in requirement shown by that toilet’s manufacturer.
A broadly accepted definition is the wall-to-drain-center measurement. A model-specific specification is the dimension in the installation sheet for the toilet you plan to install. A worked example is your actual bathroom measurement compared with that sheet. Keeping those three ideas separate helps you avoid overgeneralizing from one toilet to another.
Worked example: deciding whether a replacement toilet is likely to fit
Suppose you measure from the finished wall to the center of the closet bolt and get a reading that lines up with the rough-in size listed for the toilet you want. Your next step is not to buy immediately. Open the installation sheet and review the full footprint, tank position, supply line location, and any notes from the manufacturer. The rough-in tells you the drain alignment is plausible, but it does not prove every part of the toilet clears trim, a vanity, a radiator, or a shutoff valve.
Now suppose your measurement does not match the rough-in shown for the model. Do not assume the toilet can be forced into place. The wax seal, flange, and outlet alignment need to be correct to avoid leaks and unstable seating. Choose a toilet offered for your rough-in, or ask a plumber whether moving the flange is practical in your floor system.
Checklist before you buy a toilet
- Measured from the finished wall, not from baseboard or trim.
- Measured to the center of the closet bolt or the center of the open flange.
- Checked both bolts if the toilet is still installed and access allows.
- Recorded the measurement before shopping.
- Opened the exact manufacturer installation sheet for the toilet model.
- Checked for nearby obstructions such as a vanity, supply valve, wall molding, heat register, or door swing.
- Confirmed water-efficiency claims through the product listing or WaterSense information when that matters to you.
- Planned to stop and call a professional if the flange is damaged, loose, badly corroded, or not level with the finished floor.
Common mistakes that cause wrong rough-in measurements
Measuring to the back of the tank
The tank is not the rough-in reference point. Tanks are shaped differently across models, and some toilets leave more or less space behind the tank even when the drain rough-in is correct. Always measure to the bolt or drain center.
Measuring from unfinished framing
In a remodel, measuring from studs or backer board can be misleading if drywall, tile, or another finish will be added later. Manufacturer specifications refer to the installed relationship of the toilet to the finished wall surface. If the wall is not finished yet, account for the planned final surface and confirm with the installer or plumber.
Assuming every toilet in a style has the same rough-in
Two toilets can look similar and have different installation requirements. Rough-in is a model detail. Review the actual specification sheet before purchase, especially for skirted bases, compact toilets, wall-adjacent tanks, or any design that hides the trapway.
Ignoring the supply shutoff and nearby fixtures
The rough-in only locates the waste outlet. It does not tell you whether the tank will hit a supply valve, whether the seat will clear a vanity, or whether a door can swing freely. Those checks require separate measurements from the toilet specification and your room layout.
Water use and maintenance implications
If you are replacing an older toilet, rough-in is only one part of the decision. The EPA’s WaterSense program identifies residential toilets that meet its water-efficiency and performance criteria, and it maintains consumer guidance on residential toilets at EPA WaterSense residential toilets. If you choose a WaterSense-labeled model, still confirm the rough-in and installation requirements in the manufacturer’s documents.
EPA WaterSense also emphasizes home maintenance as part of reducing water waste, including paying attention to leaks and fixture performance. After installing a toilet, watch for rocking, water around the base, repeated tank refilling, or unexplained water use. Those symptoms may point to installation or maintenance problems and should be addressed promptly. See EPA WaterSense home maintenance for broader water-saving maintenance guidance.
When this advice does not apply
This guide is for typical floor-mounted residential toilets that use a floor flange and closet bolts. It may not apply to wall-hung toilets, rear-outlet toilets, concealed-tank systems, commercial restroom fixtures, boats, RVs, or unusual historic plumbing. Those installations can use different carrier systems, outlet locations, and manufacturer-specific dimensions.
It also does not replace local plumbing code, building rules, lease requirements, or a manufacturer’s installation manual. If you are a renter, get written permission before replacing a toilet or altering plumbing. If the work involves moving a drain, opening a floor, repairing structural damage, or changing plumbing inside a wall, treat it as professional work unless you are qualified and allowed to perform it in your area.
Stop and call a professional if you see these issues
- The toilet rocks, and tightening the bolts does not correct it.
- The floor around the toilet is soft, swollen, stained, or smells musty.
- The flange is cracked, loose, badly rusted, or below a new finished floor in a way you do not know how to correct.
- The drain center does not match any toilet you can reasonably buy for the space.
- You need to move the flange or cut into finished flooring, subfloor, or framing.
- You find active leakage, sewage odor, or signs that wastewater has been escaping under the toilet.
For general household safety during repair projects, the U.S. Consumer Product Safety Commission publishes home safety materials at CPSC home safety publications. Toilet replacement is not usually an electrical project, but bathrooms combine water, hard surfaces, tools, and limited working space, so basic home safety practices still matter.
Final action: how to measure toilet rough in before shopping
- Stand facing the toilet and identify the finished wall behind it.
- Lift a bolt cap at the toilet base if needed.
- Measure straight from the finished wall to the center of the closet bolt.
- Record the measurement and take a photo.
- Open the exact toilet installation sheet and match the rough-in requirement.
- Check surrounding clearances and obstructions separately.
- Call a plumber if the flange, floor, or drain location looks questionable.
How we prepared this guide
Home DVP prepared this guide by checking the measurement method and terminology against manufacturer-style toilet installation information and official water-efficiency and safety resources. We did not perform hands-on testing or inspect a specific bathroom. Because toilet dimensions are model-specific, confirm the final rough-in, footprint, and installation steps in the manual for the toilet you plan to install.